Automate Like a Pro: Mastering Component Generation in React with Generate React CLI
Table of contents
- A Brief Introduction to React Components
- The Need for Automating React Components Generation
- Introducing Generate React CLI
- Using Generate React CLI
- Override the default configuration with options
- Generate React CLI as a dev dependency
- Customize Component Templates
- Generate Custom Component Files
- Developing Personalized Component Types
- Benefits of Using Generate React CLI
- Wrapping Up
Simplify React component creation, automate file generation, and customize templates with Generate React CLI. Boost productivity and maintain code consistency effortlessly!

Being a React developer is exciting. With its component-based architecture, React has revolutionized the way we build user interfaces.
Creating new components manually in React can be a tedious and time-consuming task. As a software engineer or a front-end developer, you might often find yourself copying, pasting, and renaming files for every new component you create. This is where automating React components generation comes in. This article is a comprehensive guide that will help you master the process of generating React components automatically using a tool called “Generate React CLI.”
A Brief Introduction to React Components
React is a popular JavaScript library for building user interfaces. It allows developers to create large web applications that can change data without reloading the page. The main building blocks of a React application are React components.
React components are independent, reusable pieces of code. They serve the same purpose as JavaScript functions, but work in isolation and return HTML via a render function.
The Need for Automating React Components Generation
Automating the generation of React components can significantly streamline the development process, especially for seasoned front-end developers. Manual creation of these components, although initially engaging for novices, can quickly become burdensome and time-consuming. This typically involves duplicating extensive code, configuring test and style files, and preparing storybook files, among other repetitive actions.
With automation, developers can bypass the tedium of repetitive tasks, enabling quicker and more efficient code production. By automating component generation, developers can focus more on complex problem-solving and creative aspects of development, thus optimizing productivity and project quality.
Introducing Generate React CLI
Generate React CLI — is an open-source tool that automates the creation of React components. It generates a component folder and files for each component, including tests, styles, and Storybook files. This tool allows you to customize your components and create your component types and templates, making it a flexible solution for React developers.
This tool is available as an NPM package and can be installed into any React project. It can be used as a dependency or as a command in the console.
To use Generate React CLI, you need to have Node version 18.x or higher and NPM version 10.x or greater installed on your computer. You can install Generate React CLI as a dev dependency using the command:
npm i --save-dev generate-react-cli
or
yarn add -D generate-react-cli
Alternatively, you can run it directly using npx:
npx generate-react-cli component Box
Note: npx is a package runner tool that ships with npm 5.2+*.*
Using Generate React CLI
A simple command:
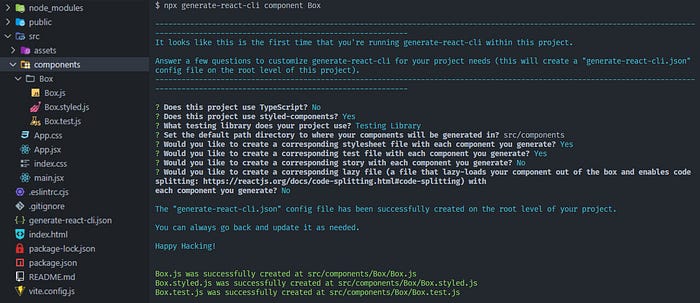
npx generate-react-cli component Box
Executed in the console begins the magic. A brief Q&A session is initiated, inquiring about your usage of TypeScript, styled-components, testing, and a lot more. And it creates a new React component named Box. The answers to these questions are stored in a generate-react-cli.json config file at the root of your project, ready for future references and customizations.

Here is an example of the generate-react-cli.json config file:
{
  "usesTypeScript": false,
  "usesStyledComponents": true,
  "testLibrary": "Testing Library",
  "component": {
    "default": {
      "path": "src/components",
      "withStyle": true,
      "withTest": true,
      "withStory": false,
      "withLazy": false
    }
  }
}
Override the default configuration with options
You can override some of the default configuration rules using one-off commands. For example, if you have set withTest to be true in the component.default property, you can override it like this:
npx generate-react-cli component Box --withTest=false
If you have set withTest to be false, you can override it like this:
npx generate-react-cli component Box --withTest=true
If you don’t pass any options, the default values that you have set in the generate-react-cli.json config file under the component.default will be used.
Other options can be found on the Generate React CLI GitHub repository
Generate React CLI as a dev dependency
What is the disadvantage of using the utility as such a long command:
npx generate-react-cli component Box, this is that everyone inside the team must remember all this history to use and so on. It is better to just install generate-react-cli as a dev dependency.
npm i --save-dev generate-react-cli
or
yarn add -D generate-react-cli
As we obtained the dependence of D, we can create an npm script and the same story is a little shorter.
Suppose we have a script called component, and to create components we can now say either
npm run component ComponentName
or just
yarn component ComponentName
and create the component name, the same thing happens, just a little shorter.
Also, no one needs to memorize a long command. We can always go to the package.json and execute the command that is there.
{
  "name": "component-generate-react-cli",
  "private": true,
  "version": "0.0.0",
  "type": "module",
  "scripts": {
    "dev": "vite",
    "build": "vite build",
    "lint": "eslint . --ext js,jsx --report-unused-disable-directives --max-warnings 0",
    "preview": "vite preview",
    "component": "generate-react component"
  },
  "dependencies": {
    "react": "^18.2.0",
    "react-dom": "^18.2.0"
  },
  "devDependencies": {
    "@types/react": "^18.2.66",
    "@types/react-dom": "^18.2.22",
    "@vitejs/plugin-react-swc": "^3.5.0",
    "eslint": "^8.57.0",
    "eslint-plugin-react": "^7.34.1",
    "eslint-plugin-react-hooks": "^4.6.0",
    "eslint-plugin-react-refresh": "^0.4.6",
    "vite": "^5.2.0"
  }
}
Customize Component Templates
Generate React CLI also provides a customTemplates object where the keys represent the file type, and the values are paths pointing to your custom template’s location in your project.
Template File Examples:


An example of a customTemplates object:
{
  "usesTypeScript": false,
  "usesStyledComponents": true,
  "testLibrary": "Testing Library",
  "component": {
    "default": {
      "customTemplates": {
        "component": "templates/default/TemplateName.jsx",
        "style": "templates/default/TemplateName.styled.jsx"
      },
      "path": "src/components",
      "withStyle": true,
      "withTest": true,
      "withStory": false,
      "withLazy": false
    }
  }
}
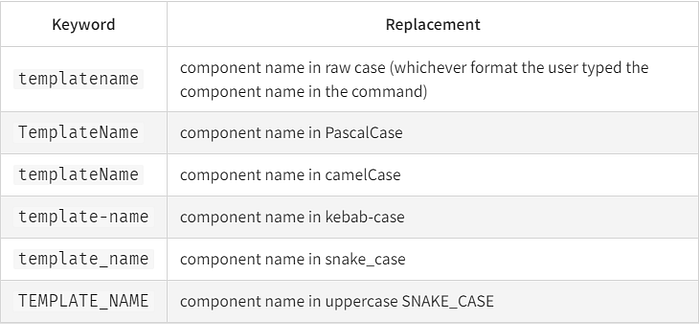
Note: the TemplateName keyword, as this keyword is used by GRC and will replace it with our component name based on one of the formats in which we entered the component name into the command as a filename. However, you can use the following keywords in your custom templates to properly format component names in your templates:

Generate Custom Component Files
When you use Generate React CLI, it automatically generates essential files for your component, such as styles, tests, stories, and lazy loading support. However, you have the flexibility to customize this process by editing the generate-react-cli.json configuration file.
If you want additional files, you can specify them by adding new keys prefixed with “with” in the configuration. For instance, if you wish to include an index.js file for each component to streamline imports, you can enable this feature by setting “withIndex” to true and adding “index” to the “customTemplates” object.
{
 "usesTypeScript": false,
 "usesStyledComponents": true,
 "testLibrary": "Testing Library",
 "component": {
  "default": {
   "customTemplates": {
    "component": "templates/default/TemplateName.jsx",
    "style": "templates/default/TemplateName.styled.jsx",
    "index": "templates/default/index.jsx"
   },
   "path": "src/components",
   "withStyle": true,
   "withTest": true,
   "withStory": false,
   "withLazy": false,
   "withIndex": true
  }
 }
}

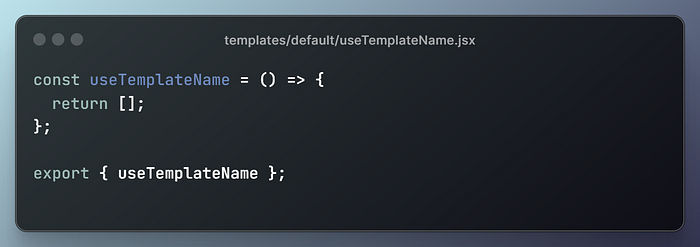
Similarly, we can create our own hook, let’s say it will be called useTemplateName accordingly here we will have withHook: true
{
 "usesTypeScript": false,
 "usesStyledComponents": true,
 "testLibrary": "Testing Library",
 "component": {
  "default": {
   "customTemplates": {
    "component": "templates/default/TemplateName.jsx",
    "style": "templates/default/TemplateName.styled.jsx",
    "index": "templates/default/index.jsx",
    "hook": "templates/default/useTemplateName.jsx"
   },
   "path": "src/components",
   "withStyle": true,
   "withTest": true,
   "withStory": false,
   "withLazy": false,
   "withIndex": true,
   "withHook": true
  }
 }
}

Developing Personalized Component Types
By default, the Generate React CLI uses component.default configuration rules to generate new components. However, we may want to generate other types of components that have their own set of configuration rules, such as pages or layout components.
Additionally, we can also augment these types components with templates.
You can do this by extending the generate-react-cli.json configuration file as follows:
{
 "usesTypeScript": false,
 "usesStyledComponents": true,
 "testLibrary": "Testing Library",
 "component": {
  "default": {
     "customTemplates": {
      "component": "templates/default/TemplateName.jsx",
      "style": "templates/default/TemplateName.styled.jsx",
      "lazy": "templates/default/TemplateName.lazy.jsx",
      "index": "templates/default/index.jsx"
     },
     "path": "src/components",
     "withStyle": true,
     "withTest": false,
     "withStory": false,
     "withLazy": false,
     "withIndex": true
     },
    "page": {
     "customTemplates": {
      "component": "templates/page/TemplateName.jsx",
      "lazy": "templates/page/TemplateName.lazy.jsx",
      "style": "templates/page/TemplateName.styled.jsx",
      "index": "templates/page/index.jsx"
     },
     "path": "src/pages",
     "withLazy": true,
     "withStory": false,
     "withStyle": true,
     "withTest": false,
     "withIndex": true
    },
    "layout": {
     "customTemplates": {
      "component": "templates/layout/TemplateName.jsx",
      "index": "templates/layout/index.jsx"
     },
     "path": "src/layouts",
     "withIndex": true
   }
  }
 }
}
In the above configuration file, there are three types of components: default, page, and layout. Each type of component has its own configuration rules.
We can generate a component of a particular type using the — type option:
npx generate-react-cli component HomePage --type=page
The above command generates a new React component of the type page with the name HomePage.
We can also create our script for this by adding it to package.json to make it a bit faster and easier.
npm run page HomePage
{
  "name": "component-generate-react-cli",
  "private": true,
  "version": "0.0.0",
  "type": "module",
  "scripts": {
    "dev": "vite",
    "build": "vite build",
    "lint": "eslint . --ext js,jsx --report-unused-disable-directives --max-warnings 0",
    "preview": "vite preview",
    "component": "generate-react component",
    "page": "generate-react component  --type=page",
    "layout": "generate-react component  --type=layout"
  },
  "dependencies": {
    "react": "^18.2.0",
    "react-dom": "^18.2.0"
  },
  "devDependencies": {
    "@types/react": "^18.2.66",
    "@types/react-dom": "^18.2.22",
    "@vitejs/plugin-react-swc": "^3.5.0",
    "eslint": "^8.57.0",
    "eslint-plugin-react": "^7.34.1",
    "eslint-plugin-react-hooks": "^4.6.0",
    "eslint-plugin-react-refresh": "^0.4.6",
    "vite": "^5.2.0"
  }
}
You can see my proposed and finalized GLC component types in their final form on my GitHub, where not only are layouts and pages added, but there is also a template for quickly creating a redux store.
Benefits of Using Generate React CLI
While we have already discussed the basics of using Generate React CLI, let’s dive deeper into its benefits and how it can transform your development process.
1. Increased Productivity
As mentioned earlier, manually creating react components can be a tedious and time-consuming task. With Generate React CLI, you can automate this process and save yourself hours of repetitive work. This allows you to focus on more critical aspects of your project, ultimately increasing your productivity.
2. Consistency in Code
Consistency is crucial in software development, especially when working with teams. With the Generate React CLI, all components are created using the same set of defaults, ensuring consistency throughout your codebase. This avoids any confusion or discrepancies in the code and makes it easier for team members to work together seamlessly.
3. Customizability
The ability to create custom templates and add them to Generate React CLI allows you to tailor the tool according to your specific project needs. This not only enhances its functionality but also makes it more versatile and suitable for a wide range of projects.
4. Time-Saving
With Generate React CLI, creating components is just a matter of executing a few simple commands. This not only saves time but also reduces the chances of errors that may occur while manually creating components. This feature is particularly useful when working on tight deadlines or complex projects.
Wrapping Up
Automating the process of generating React components can save a lot of time and improve productivity. With Generate React CLI, you can automate this process and customize it to suit your project’s needs. Whether you are a novice or an experienced React developer, mastering component generation can make your work easier and more enjoyable.
Remember, being a successful software engineer is not just about writing code. It’s also about finding ways to work smarter and making the most of the tools available to you.
Thanks For Reading, Follow Me For More
Email: erik.harutyunyan.0133@gmail.com
LinkedIn: linkedin.com/in/erikharutyunyan